Sixty gigabytes on Monday. Twelve on Tuesday.
You installed the update because macOS asked and it was late. This morning a document will not save, and System Settings → General → Storage shows a coloured bar with a large grey block labelled System Data that you cannot click into.
Nothing has gone wrong. An update replaces a huge number of files at once, and the leftovers land in a handful of specific folders that all have names. The space is findable. Most people never find it because the tool macOS gives them for looking is a bar chart with seven categories and no way to open any of them.
That is the actual problem — not a shortage of advice, a shortage of sight. There is a way to see the whole disk in about five minutes, and the rest of this post is what you will be looking at.
A bar tells you the shape of the problem, not where it is
Storage settings can say that 90 GB is System Data. It cannot say that 38 GB of that is old iPhone backups and 14 GB an installer you no longer need. So the hunt becomes hunches checked one folder at a time with Cmd + I, and it often ends without an answer, because the folder that grew is the one you never thought to check. On a small disk, a monthly look at what is growing on a 256 GB Mac catches it sooner.
The question worth answering is not what is generally safe to delete on a Mac. It is what on this Mac got big — and that needs a picture of your disk.
The fast path: scan, look at the biggest rectangles, act on them
Klarity, the Mac disk space analyzer I build, draws your disk as a treemap. Every folder is a rectangle and its area is the space it holds, so the folder that swallowed your free space is the largest shape on screen. You do not deduce which one it is. You look at it.
Each rectangle is also coloured by when it last changed, which is the distinction that matters after an update: big and old is yours to deal with; big and changed last night is usually something macOS is still using.
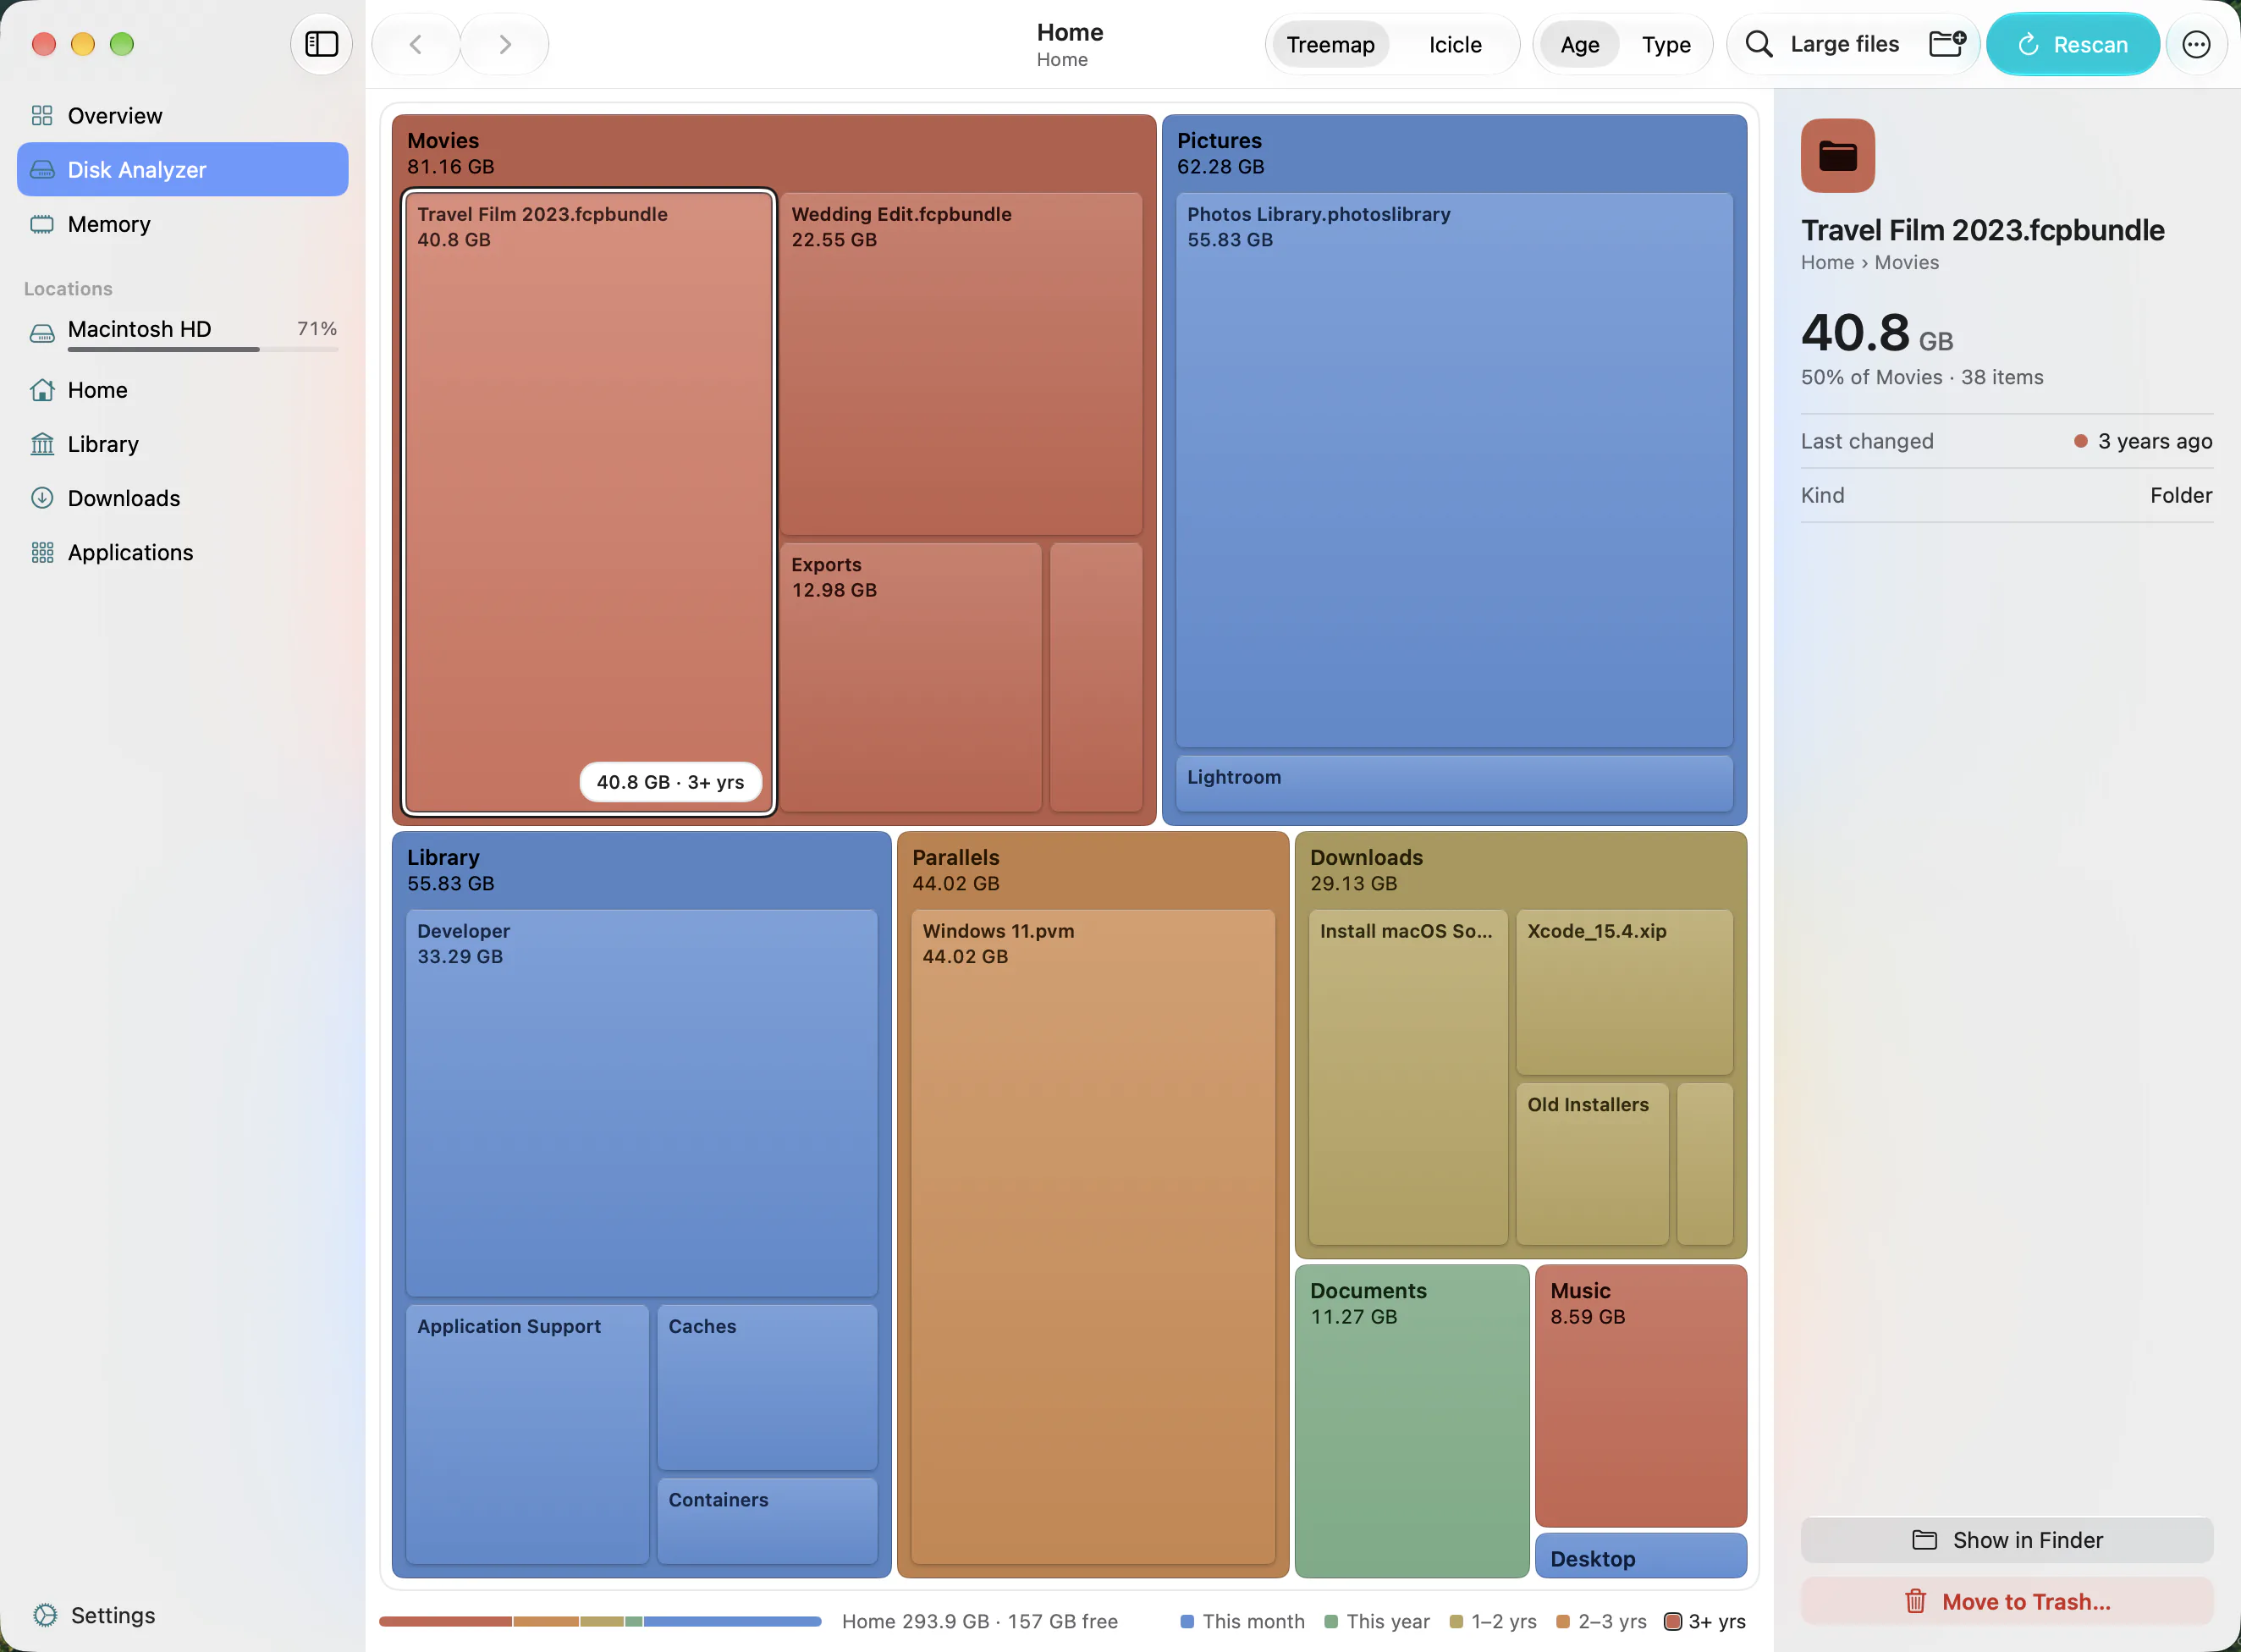
Then deal with it in the same window: right-click the rectangle and Move to Trash. It asks first every time, a folder of 1 GB or more needs a deliberate slide to confirm rather than a click, and it only ever moves things to the Trash — never deletes outright, never empties the Trash for you. There is an icicle view for reading the hierarchy as layers instead of areas, and a large-file finder for single enormous files. Since version 1.3 it asks for disk access once per volume and remembers it, so trashing works anywhere you have scanned (see the changelog).
It is $6.99 on the Mac App Store — one payment, no subscription, macOS 14.6 or later. If your disk is full right now, that is the shortest distance between here and knowing why.
Where the space went: what the big rectangles turn out to be
After an update the same few things show up large. One of them, on macOS 27, is not a folder you can scan at all: Apple Intelligence’s models, which download by themselves after the upgrade. Here is how to recognise each on your own screen.
- A 10 GB-plus block in Applications called
Install macOS <name>.app. The full installer, still there after doing its job. Move it to the Trash and empty the Trash; it is re-downloadable from the App Store. The easiest win on the list. (Clearing room before an upgrade instead? See how much free space to clear before upgrading.) - A large folder under
Application SupportnamedMobileSync. iPhone and iPad backups, one folder each, commonly 10 to 50 GB. Delete them the supported way rather than by hand: Finder → your device in the sidebar → Manage Backups. - A
Developerfolder that dwarfs everything else. Only if you write software.Xcode/iOS DeviceSupportkeeps a folder per OS version you have debugged against, andDerivedDatais build output that regenerates itself. Both can go. Remove unused simulator runtimes through Xcode → Settings → Platforms. - A large
Cachesfolder coloured as changed today. Browsers, Mail and the search index all rebuild after an update, so it climbs for a day or two and then levels off. The colour is the tell: clearing it mid-rebuild makes your Mac do the work twice. - The Trash. Things in it still occupy the disk. Obvious, and still how a fair number of these searches end.
If the biggest thing on your scan is something you do not recognise, what System Data on a Mac actually is covers what lives in there and what is safe to remove.
Klarity is $6.99 on the Mac App Store, and you will know which of those five it was on your Mac within ten minutes of installing it.
What comes back on its own after a macOS update
Some of the missing space is not yours to reclaim. An update keeps snapshots of the system as it was before the install, and stages the update payload on disk while it works. macOS releases both by itself, usually within a day or two of a restart — Apple documents the same behaviour in its own guide to a full startup disk — and Spotlight is reindexing meanwhile, so the Storage settings numbers are not fully trustworthy until it finishes.
Restart, give it a day, and expect a chunk to come back with no action from you. Do not switch off Time Machine to stop the number growing — that trades a temporary space problem for a permanent recovery problem.
It looks inside the folder macOS hides
Much post-update growth lives in ~/Library, which macOS marks as hidden, so Finder never shows it. Klarity scans hidden folders (since version 1.3.1), so a plain Home scan includes Caches, Developer and Containers. To look at Library on its own, click Library in the sidebar.
Why $6.99 once is the right call here
One payment. No subscription, no account, no sign-in. No telemetry either — the app has no network entitlement at all, so it has no way to send anything anywhere. macOS 14.6 or later, Apple Silicon and Intel.
The alternatives are a subscription cleaner and doing it by hand. A subscription bills you every year for a job you do two or three times a year, in exchange for giving an app broad authority over your files. Doing it by hand costs an evening every few months and often ends without the answer. Klarity is bought once, does one thing, and cannot remove anything permanently — the worst mistake available to you is dragging something back out of the Trash.
Comparing it against a specific paid analyser? I have written an honest comparison that says where the other one is better. For the broader job once this update is behind you, see how to clean up Mac storage safely.
Questions people ask
Why is my Mac storage full after updating macOS?
An update rewrites an enormous number of files at once, and things pile up around it: snapshots of the system as it was before the install, the installer app left in Applications, caches rebuilding themselves, and often a phone backup taken the same week. Thirty gigabytes disappearing overnight is ordinary. The trouble is that Storage settings will not tell you which of those it was.
Will the space come back on its own after a macOS update?
Some of it. macOS releases the update snapshots and the staged update payload itself, usually within a day or two of a restart, and the Storage settings numbers only settle once Spotlight has finished reindexing. What never comes back on its own is the installer app, old device backups and developer tooling.
Is it safe to delete the Install macOS app after updating?
Yes. Once your Mac is running the new version, the installer sitting in Applications has done its job and is more than ten gigabytes of dead weight. Move it to the Trash and empty the Trash. You can download it again from the App Store if you ever need it.
How do I find what is actually using the space, rather than guessing?
Scan the disk with a treemap. It draws every folder as a shape whose area is the space it holds, so the folders responsible are the largest ones on screen and you read the answer instead of working it out. That is what Klarity does, for $6.99 once on the Mac App Store.
Does Klarity delete my files?
No. It only ever moves things to the Trash, and it asks first every time. A folder of 1 GB or more needs a deliberate slide to confirm rather than a click, and anything smaller gets a plain confirmation alert. It never deletes outright and never empties the Trash for you.
— Mukul