Two numbers, one disk
You go to install something big, a macOS update or a game, and the installer stops: not enough free space. You check Finder, and Finder says you have plenty. Both are telling the truth. They are counting different things, and the difference has a name: purgeable space.
Purgeable space is room macOS has promised it can make, by clearing things it considers spare. Finder counts it as available. The installer only cares what is free right now. And nothing on your Mac shows you what the purgeable part is made of, or what the rest of your disk is full of. You get two numbers and no picture.
That missing picture is the real problem, and it is what this post is about: what purgeable space is, why it does not clear when you need it, and how to see where your space actually is.
What “purgeable” is made of
Purgeable is not a folder. It is a label macOS puts on space it believes it can win back by itself. In practice it comes from three places.
- Time Machine’s local snapshots. With Time Machine on, Apple says your Mac saves a snapshot of the startup disk about every hour and keeps it for 24 hours, plus an extra one before any macOS update. A snapshot holds on to files as they were, so space you freed by deleting something can stay taken until the snapshot ages out. Apple is plain about how it is counted: “Your Mac counts the space used by snapshots as available storage.”
- iCloud files that could be downloaded again. If Optimize Mac Storage is on for iCloud Drive or Photos, files you have not opened in a while can be kept only in iCloud when space runs short, and downloaded again when you open them. Until that happens, the copies on your Mac count towards purgeable. The same goes for watched Apple TV films and old Mail attachments if you turned on Optimize Storage in Storage settings.
- Caches and temporary files. Data apps and macOS keep to work faster, which they can rebuild if it goes.
You can see the figure for yourself. Select Macintosh HD in Finder and choose File → Get Info: next to Available, Finder often adds how much of it is purgeable. What it will not tell you is which snapshot, which iCloud folder or which cache that number is.
See the space that is really yours, with Klarity
Klarity, the Mac disk space analyzer I build, takes the strict view. The free figure it shows in the bar under the map is the space free right now. It does not count purgeable space as free, so it is close to the number an installer will check, and lower than Finder’s.
Then it shows you the rest. Click Macintosh HD in the sidebar, give Klarity access once if it asks, and your disk becomes a treemap: every folder is a rectangle, its area is the space it really takes on disk, and its colour says how long since it last changed, from blue for this month to red for three years or more. The biggest rectangles are where your space has gone.
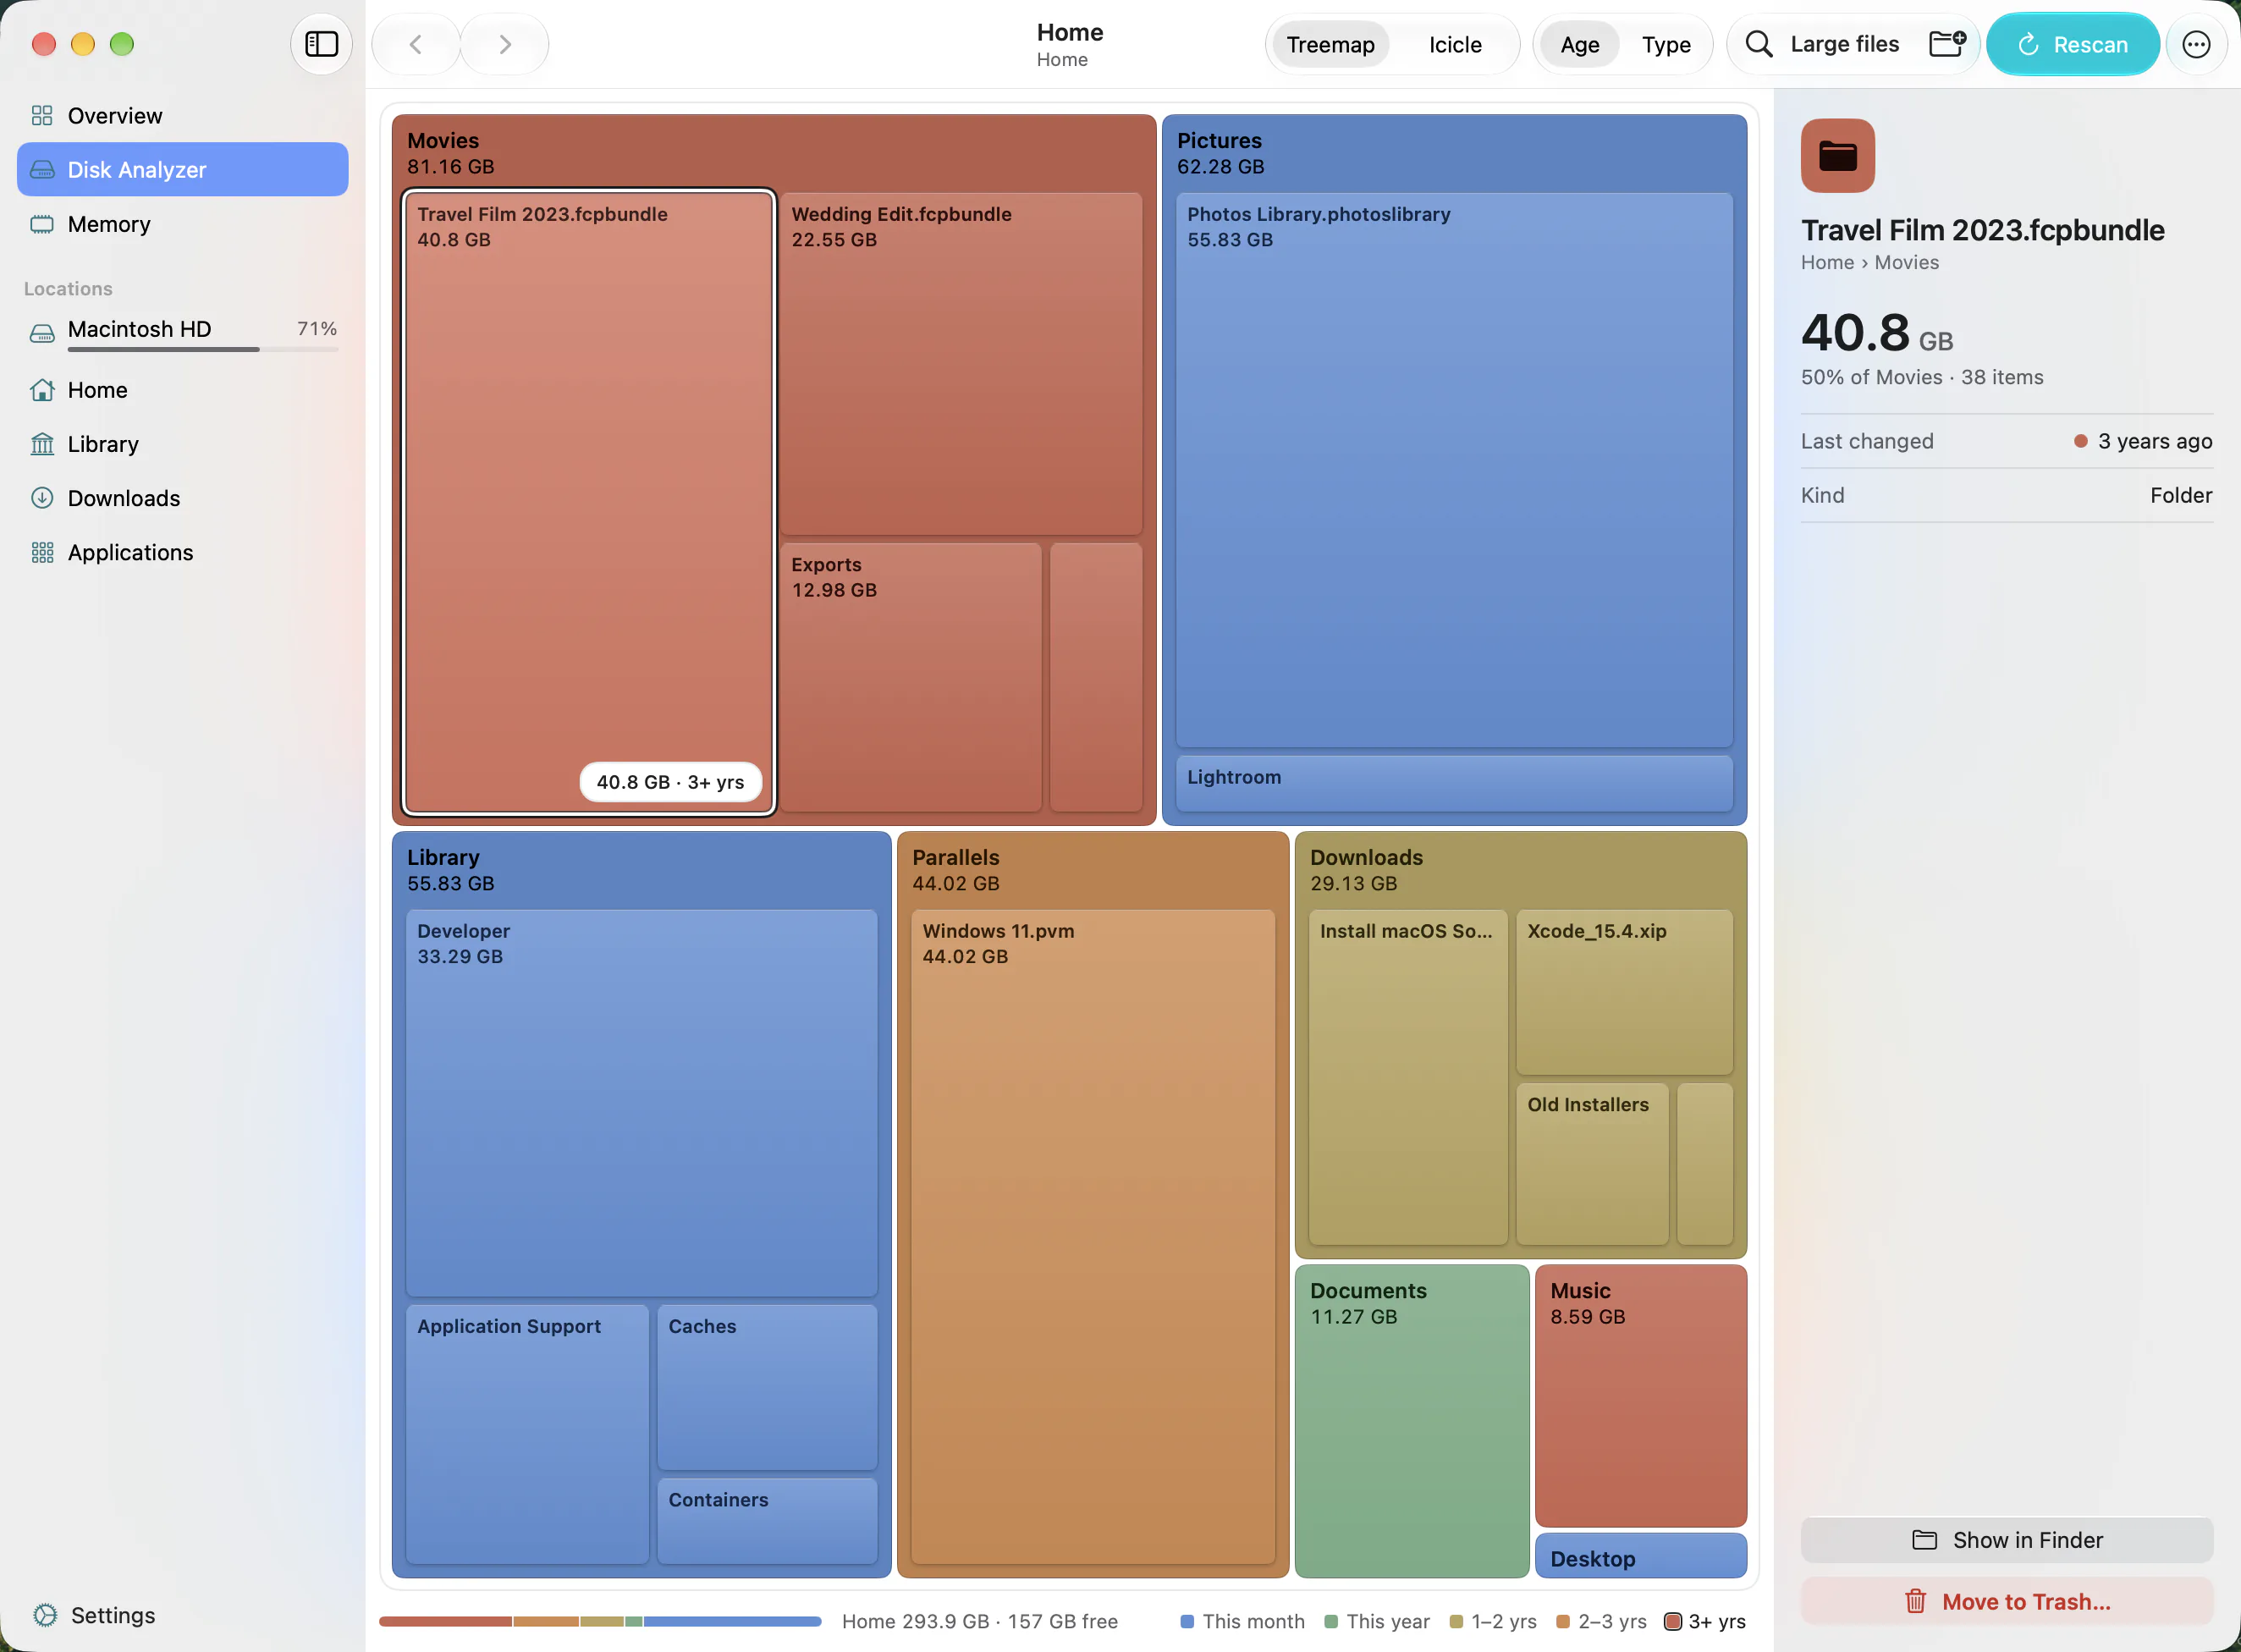
This is where purgeable gets easier to reason about. Klarity measures what is actually stored on the disk, so an iCloud file that lives only in iCloud counts as almost nothing, and a file you have downloaded counts in full. Your iCloud Drive files live inside the hidden Library folder, in one called Mobile Documents; Klarity scans hidden folders, so you can see how much of iCloud is sitting on your Mac today. The same goes for Caches, also in Library.
One honest limit. Time Machine’s local snapshots are not files in any folder, so Klarity cannot see inside them, show them on the map, or delete them. No disk map can. If Finder’s available figure and Klarity’s free figure are tens of gigabytes apart, snapshots are usually much of the gap.
Klarity is $6.99 once on the Mac App Store, for macOS 14.6 or later. No subscription, no account, and no network access at all.
Why it does not clear in time for an installer
macOS clears purgeable space when something asks for it, gradually and in its own order. An installer tends to check the free space once, up front, and stop if it is short, before macOS has had a reason to start clearing. So the space you were promised is still there, still purgeable, and the install has already given up. How much space macOS 27 needs covers the numbers for this year’s upgrade.
Snapshots add a delay of their own. Each one is kept for about a day, so space you freed this morning may not come back until tomorrow. Right after a macOS update the gap is at its largest, which is why a full disk after an update often fixes itself in a day or two.
What you can do, in plain steps
In order, cheapest first. None of these needs Terminal.
- Empty the Trash. Anything in it still takes up the disk until you do.
- Restart, wait a few minutes, and try again. A restart gives macOS a chance to clear temporary files, and the installer gets a fresh look at the disk. If you deleted things today, try again tomorrow, once the snapshots holding them have aged out.
- Leave Time Machine on. Turning it off to win back snapshot space trades a short wait for losing the copies that let you rescue a file you deleted an hour ago.
- Remove downloads of big iCloud files you do not need on this Mac. In Finder, find the file or folder in iCloud Drive, Control-click it and choose Remove Download. It stays in iCloud and the space is free at once. Klarity’s map of Mobile Documents shows which iCloud folders are worth doing this to. Do not move iCloud files to the Trash to make room: that deletes them from iCloud and your other devices too, which is why Klarity warns you before it does.
- Start up in Safe Mode once. Apple says your Mac clears certain system caches when it starts in Safe Mode, and builds them again as needed. Restart normally afterwards.
- Review the recommendations. System Settings → General → Storage offers to remove watched Apple TV films and keep only recent Mail attachments. Read each one first: Store in iCloud, in particular, moves your Desktop and Documents into iCloud Drive.
- Make real room from your own files. If the installer still refuses, the space has to come from things macOS will never clear for you: old installers, downloads, video, virtual machines, device backups. Those are the biggest rectangles in Klarity. Right-click one and choose Move to Trash; Klarity asks first every time, a folder of 1 GB or more needs a slide to confirm, and nothing is gone until you empty the Trash yourself.
If the big thing on your map is Library, what System Data on a Mac actually is explains what lives in there and what is safe to clear.
Which number to trust
Both, for different questions. Finder’s Available is what your disk could offer once macOS has tidied up. The strict figure, the one Klarity shows, is what you can count on this minute. When you are about to install something large or copy a big project across, plan with the strict one and treat purgeable as a bonus that may arrive later.
On a small disk the gap matters more, because purgeable can be a large share of what looks free. Living with a 256 GB Mac covers keeping that under control month to month.
Questions people ask
What is purgeable space on a Mac?
It is space macOS says it can free by itself when something needs the room. It is mostly Time Machine’s local snapshots, copies of iCloud files that can be downloaded again, and caches. Finder counts it as available, but it is not free until macOS actually clears it.
Why does the installer say there is not enough space when Finder shows plenty?
Finder’s Available includes purgeable space. An installer usually checks what is free right now and stops before macOS has cleared anything. Empty the Trash, restart, wait a few minutes and try again; if it still refuses, make room from your own files.
How do I clear purgeable space without Terminal?
Restart and give it time: snapshots are kept for about a day and then removed. Remove downloads of large iCloud Drive files you do not need on the Mac, from Finder’s Control-click menu. Starting up once in Safe Mode clears certain system caches. Leave Time Machine switched on.
Does Klarity count purgeable space as free?
No. Klarity shows the space free right now, so its figure is lower than Finder’s Available. It cannot see inside or delete Time Machine’s local snapshots, but its map shows which folders, including your iCloud Drive and Caches, are really taking up the disk.
— Mukul